- Prerequisites (Prasyarat)
-
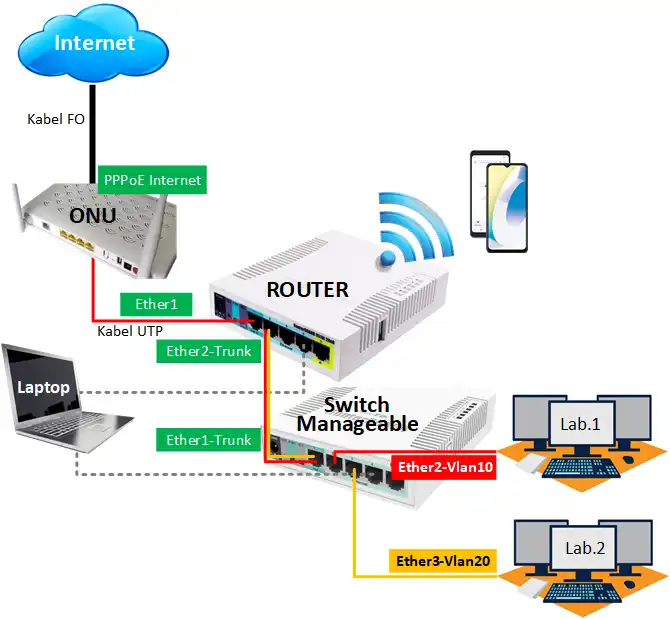
Topologi Jaringan
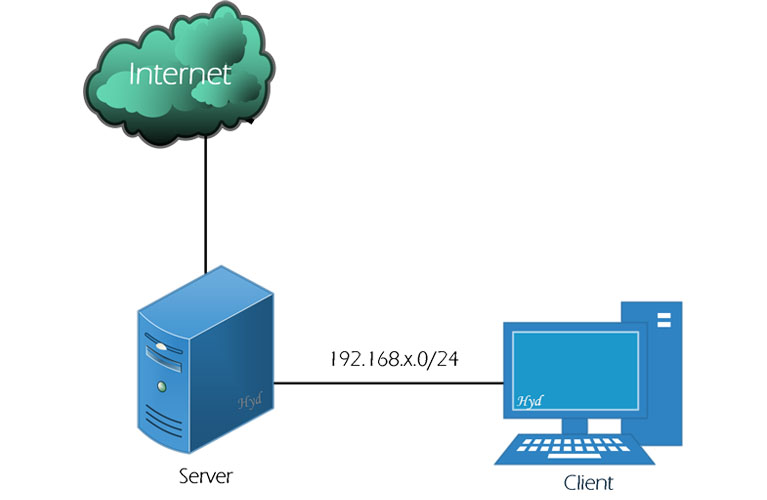
- Konfigurasi Server dan Client
Konfigurasi Server :
--------------------------------------------------
- Sistem Operasi        : Linux Debian 10 (Buster)
- IP Address NIC 1      : DHCP Internet
- Gateway               : DHCP Internet

- Hostname              : ns100             (Gantilah angka 100 dengan nomer absen anda masing-masing)
- Domain                : sekolah100.sch.id (Gantilah angka 100 dengan nomer absen anda masing-masing)
- IP Address NIC 2      : 192.168.100.1/24  (Gantilah angka 100 dengan nomer absen anda masing-masing)


Konfigurasi Client :
--------------------------------------------------
- Sistem Operasi        : Windows
- IP Address            : DHCP
-
- Seting Server
- DHCP Server
Pastikan instalasi dan konfigurasi DHCP server sudah berjalan dengan baik
- DNS Server
Pastikan instalasi dan konfigurasi DNS server sudah berjalan dengan baik
- Control Panel Hosting
Pastikan instalasi dan konfigurasi Control Panel Hosting menggunakan CloudPanel sudah berjalan dengan baik
- Install dan Konfigurasi Share Hosting Server menggunakan CloudPanel
-
Seting DOMAIN di DNS Server (bind9)
Karena yang akan kita gunakan atau uji coba adalah domain lokal maka kita harus melakukan seting atau konfigurasi terlebih dahulu pada server CloudPanel.
Disini kita akan coba menggunakan/mengelola 2 nama domain yaitu:
- guru100.sch.id (Gantilah angka 100 dengan nomer absen anda masing-masing)
- siswa100.sch.id (Gantilah angka 100 dengan nomer absen anda masing-masing)
Silahkan akses ke server dan masuklah atau login sebagai user root
login as: root
root@192.168.100.1's password:

########################################################
###            Welcome to CloudPanel                 ###
########################################################

* Website:         https://www.cloudpanel.io
* Documentation:   https://www.cloudpanel.io/docs/cloudpanel-ce/v1/
* CloudPanel:      https://sekolah100.sch.id:8443/
* CloudPanel CLI:  clpctl list

Last login: Tue Aug 10 18:38:30 2021
root@cloudpanel:~#
Pindah ke direktori bind dan edit file named.conf.local
root@cloudpanel:~# cd /etc/bind/

root@cloudpanel:/etc/bind# ls
bind.keys  db.192    db.local       named.conf.default-zones  rndc.key
db.0       db.255    db.sekolah100  named.conf.local          zones.rfc1918
db.127     db.empty  named.conf     named.conf.options

root@cloudpanel:/etc/bind# nano named.conf.local

zone "sekolah100.sch.id" {
        type master;
        file "/etc/bind/db.sekolah100";
};

zone "100.168.192.in-addr.arpa" {
        type master;
        file "/etc/bind/db.192";
};

zone "guru100.sch.id" {
        type master;
        file "/etc/bind/db.guru100";
};
zone "siswa100.sch.id" {
        type master;
        file "/etc/bind/db.siswa100";
};
Membuat file db untuk domain guru100.sch.id dan siswa100.sch.id, kita lakukan dengan mencopy dari file db.sekolah100
root@cloudpanel:/etc/bind# cp db.sekolah100 db.guru100
root@cloudpanel:/etc/bind# cp db.sekolah100 db.siswa100
root@cloudpanel:/etc/bind# ls
bind.keys  db.255      db.sekolah100             named.conf.local
db.0       db.empty    db.siswa100               named.conf.options
db.127     db.guru100  named.conf                rndc.key
db.192     db.local    named.conf.default-zones  zones.rfc1918
Edit file db.guru100
root@cloudpanel:/etc/bind# nano db.guru100

					;
; BIND data file for local loopback interface
;
$TTL    604800
@       IN      SOA     guru100.sch.id. root.guru100.sch.id. (
                              2         ; Serial
                         604800         ; Refresh
                          86400         ; Retry
                        2419200         ; Expire
                         604800 )       ; Negative Cache TTL
;
@       IN      NS      guru100.sch.id.
@       IN      A       192.168.100.1
;@      IN      AAAA    ::1

ns100   IN      A       192.168.100.1
www     IN      A       192.168.100.1
Edit file db.siswa100
root@cloudpanel:/etc/bind# nano db.siswa100

;
; BIND data file for local loopback interface
;
$TTL    604800
@       IN      SOA     siswa100.sch.id. root.siswa100.sch.id. (
                              2         ; Serial
                         604800         ; Refresh
                          86400         ; Retry
                        2419200         ; Expire
                         604800 )       ; Negative Cache TTL
;
@       IN      NS      siswa100.sch.id.
@       IN      A       192.168.100.1
;@      IN      AAAA    ::1

ns100   IN      A       192.168.100.1
www     IN      A       192.168.100.1
Edit file db.192
root@cloudpanel:/etc/bind# nano db.192

;
; BIND reverse data file for local loopback interface
;
$TTL    604800
@       IN      SOA     sekolah100.sch.id. root.sekolah100.sch.id. (
                              1         ; Serial
                         604800         ; Refresh
                          86400         ; Retry
                        2419200         ; Expire
                         604800 )       ; Negative Cache TTL
;
@       IN      NS      sekolah100.sch.id.
1       IN      PTR     sekolah100.sch.id.

1       IN      PTR     guru100.sch.id.
1       IN      PTR     siswa100.sch.id.
Restart service bind9, kemudian lakukan pengujian untuk domain guru100.sch.id dan siswa100.sch.id
root@cloudpanel:/etc/bind# /etc/init.d/bind9 restart
[ ok ] Restarting bind9 (via systemctl): bind9.service.

root@cloudpanel:/etc/bind# nslookup guru100.sch.id
Server:         127.0.0.1
Address:        127.0.0.1#53

Name:   guru100.sch.id
Address: 192.168.100.1

root@cloudpanel:/etc/bind# nslookup siswa100.sch.id
Server:         127.0.0.1
Address:        127.0.0.1#53

Name:   siswa100.sch.id
Address: 192.168.100.1

root@cloudpanel:/etc/bind# nslookup www.guru100.sch.id
Server:         127.0.0.1
Address:        127.0.0.1#53

Name:   www.guru100.sch.id
Address: 192.168.100.1

root@cloudpanel:/etc/bind# nslookup www.siswa100.sch.id
Server:         127.0.0.1
Address:        127.0.0.1#53

Name:   www.siswa100.sch.id
Address: 192.168.100.1

root@cloudpanel:/etc/bind# nslookup 192.168.100.1
1.100.168.192.in-addr.arpa      name = sekolah100.sch.id.
1.100.168.192.in-addr.arpa      name = guru100.sch.id.
1.100.168.192.in-addr.arpa      name = siswa100.sch.id.
Sampai pada tahap ini, konfigurasi untuk dua domain (guru100.sch.id dan siswa100.sch.id) pada server CloudPanel sudah selesai kita lakukan.
-
Seting DOMAIN di Control Panel CloudPanel
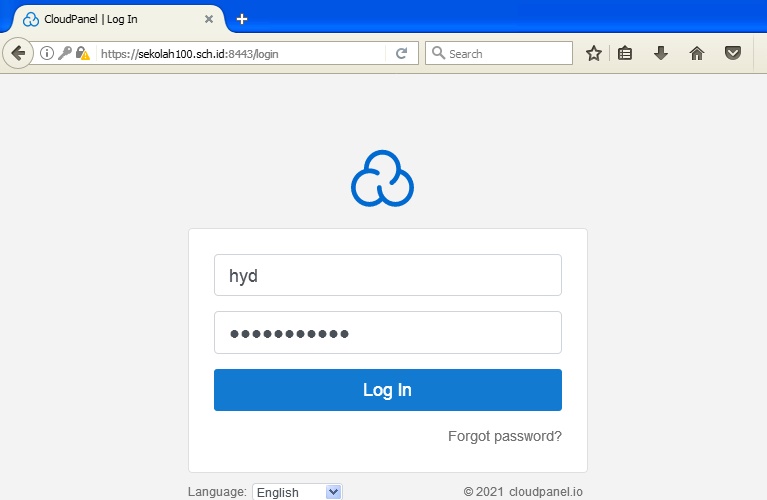
Buka browser dan ketikkan alamat url https://sekolah100.sch.id:8443 maka halaman login CloudPanel akan terbuka. Gunakan user admin dan isi password-nya dengna benar lalu klik tombol “Login”.
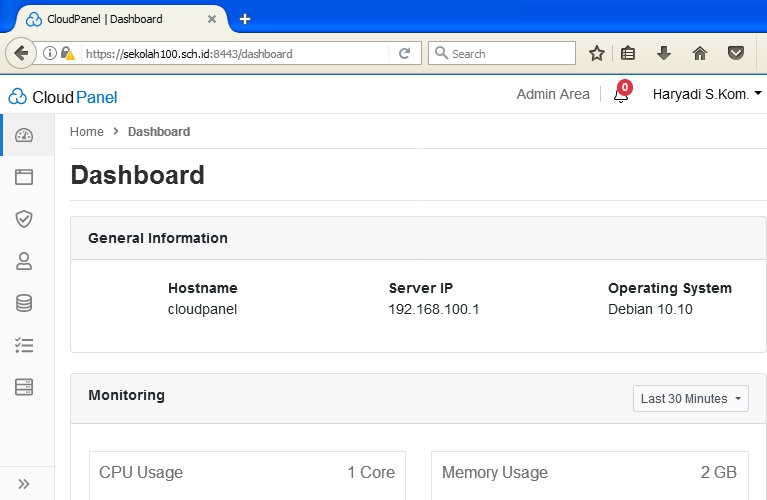
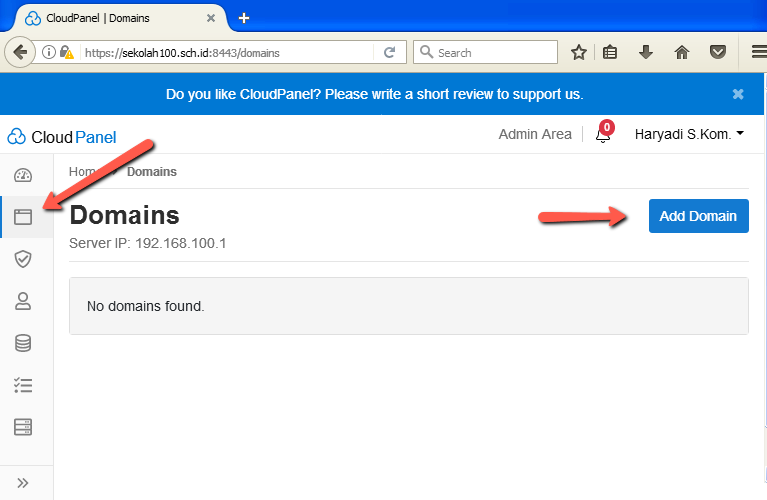
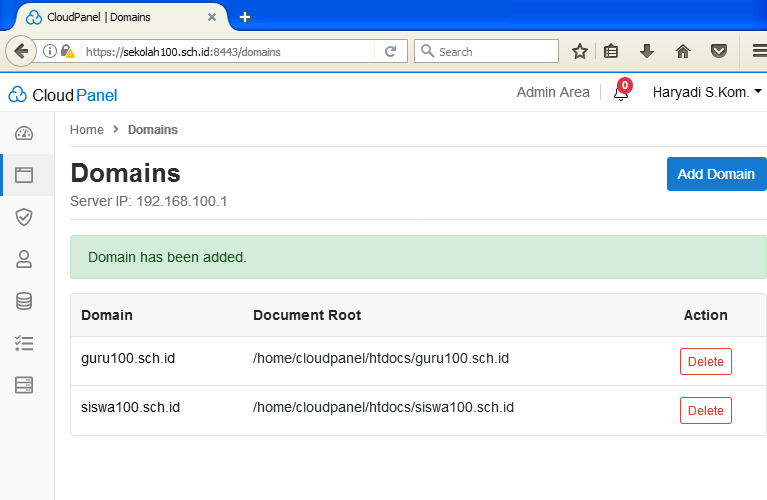
Klik menu Domain kemudian klik “Add Domain”.
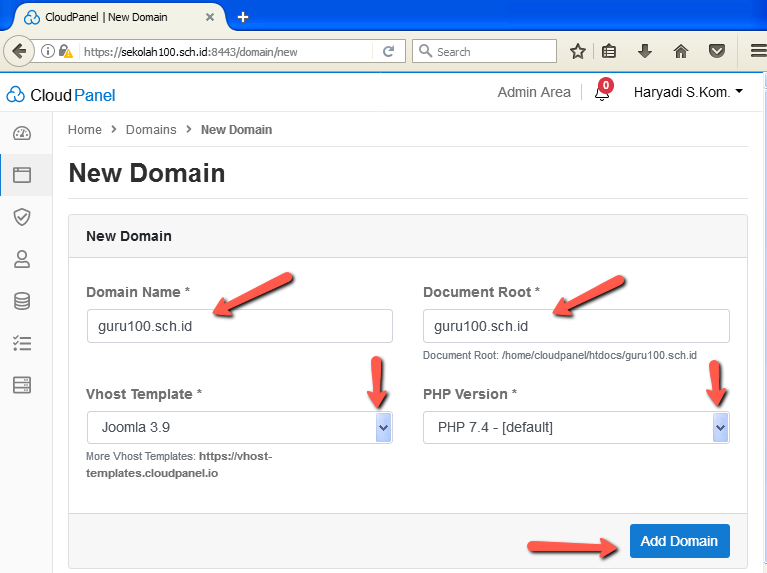
Pada kolom “Domain Name” isikan “guru100.sch.id” dan untuk yang lain silahkan untuk disesuaikan, kemudian klik tombol “Add Domain”.
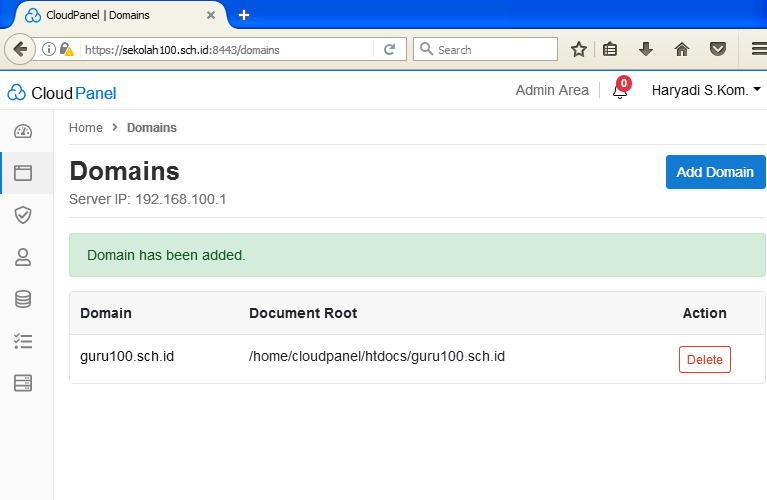
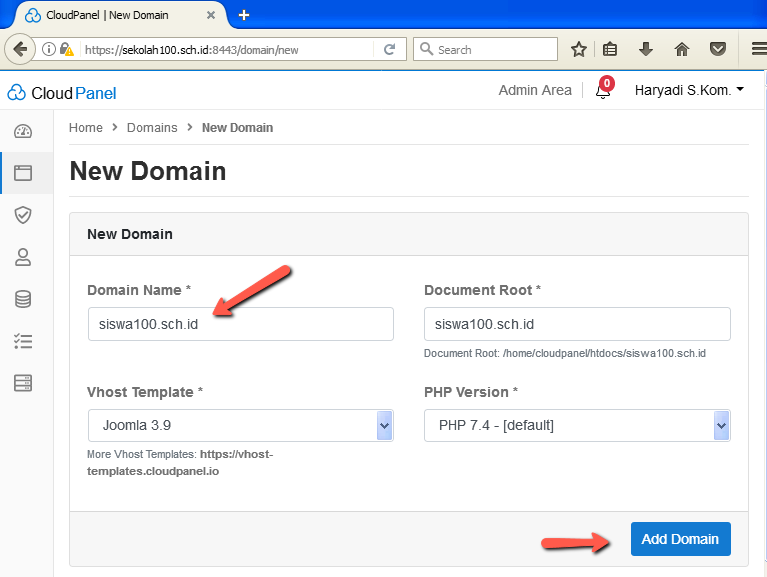
Domain guru100.sch.id berhasil di tambahkan. Selanjutnya lakukan langkah sama untuk domain siswa100.sch.id dengan menekan tombol “Add Domain” kembali.
-
Seting user untuk domain guru100.sch.id dan siswa100.sch.id
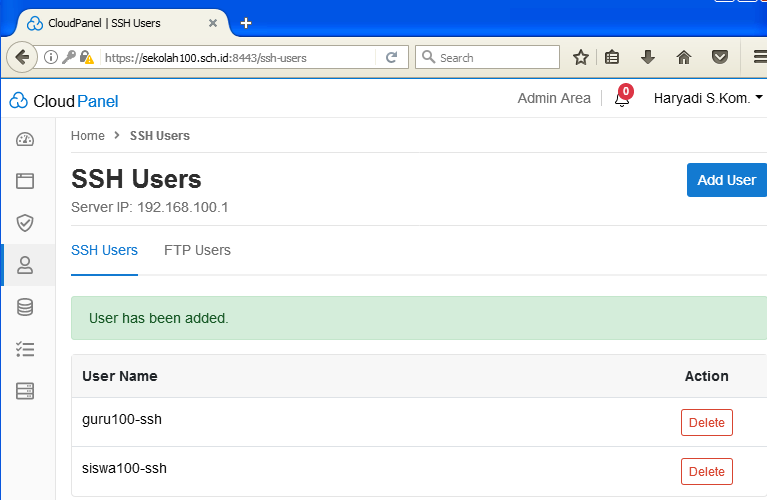
Klik menu USER – pilih SSH Users – klik tombol Add User
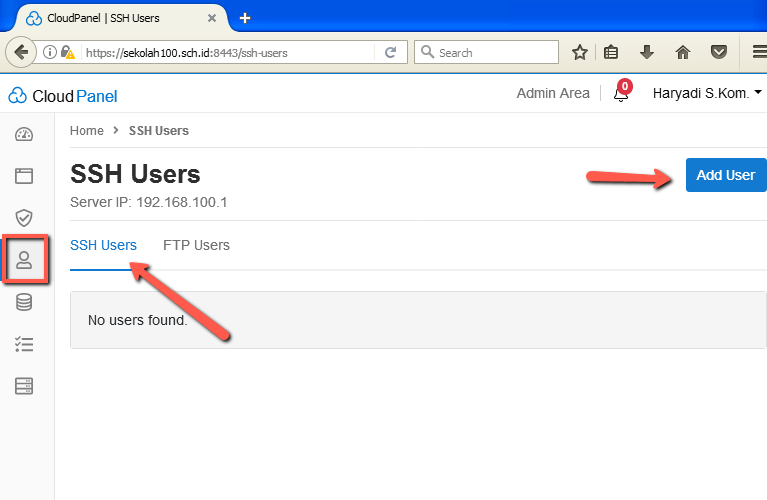
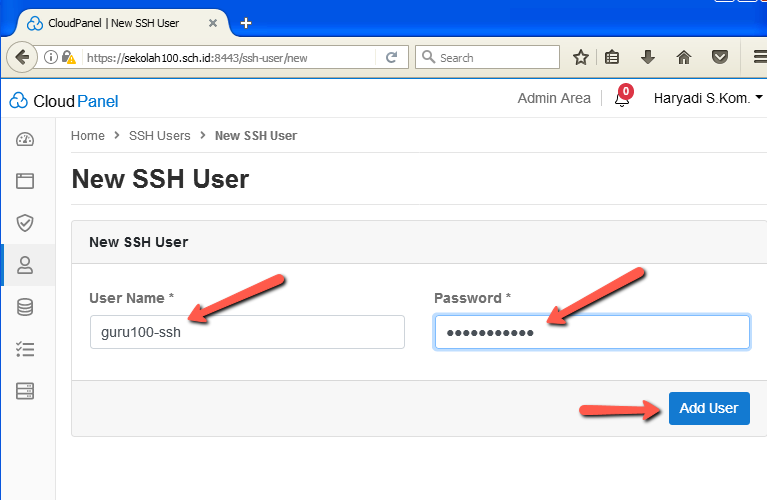
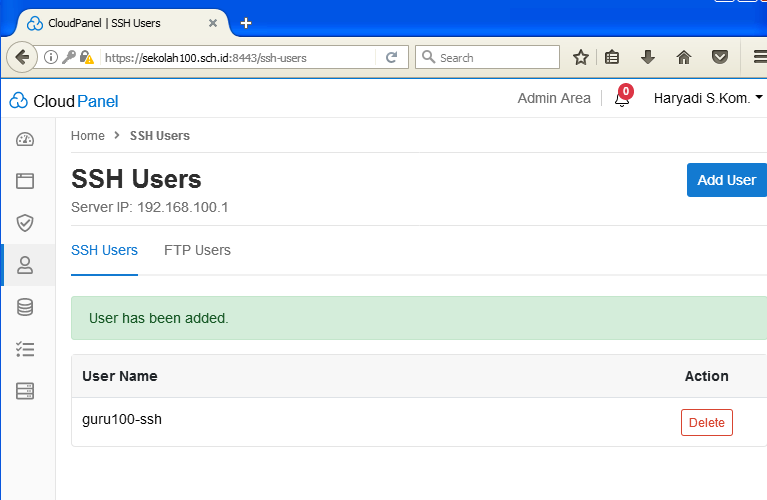
Pada kotak “User Name *” kita isi “guru100” tambahan “-ssh” secara otomatis ditambahkan oleh system CloudPanel sehingga nama user nya menjadi “guru100-ssh” kemudian ketikan passwordnya minimal 6 karakter lalu klik tombol Add User. Demikian juga untuk user siswa100-ssh.

-
Uji coba login user (guru100-ssh dan siswa100-ssh)
Menggunakan aplikasi PuTTY
login as: guru100-ssh
guru100-ssh@192.168.100.1's password:

########################################################
###            Welcome to CloudPanel                 ###
########################################################

* Website:         https://www.cloudpanel.io
* Documentation:   https://www.cloudpanel.io/docs/cloudpanel-ce/v1/
* CloudPanel:      https://sekolah100.sch.id:8443/
* CloudPanel CLI:  clpctl list

guru100-ssh@cloudpanel:~$ ls
backups  htdocs  logs  tmp
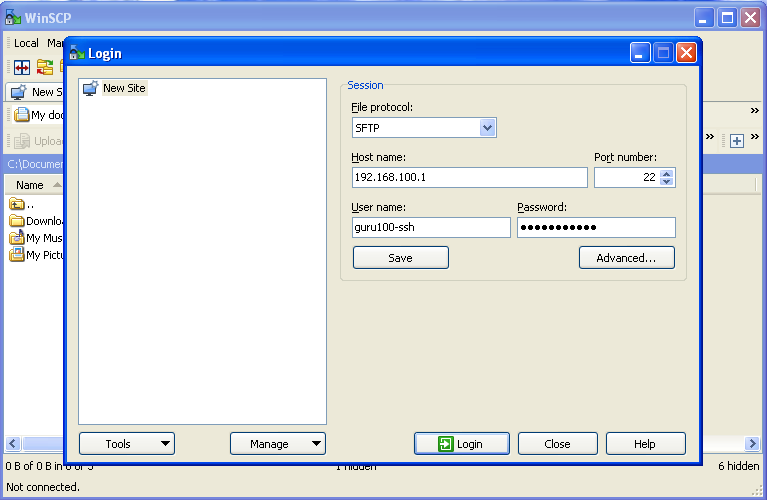
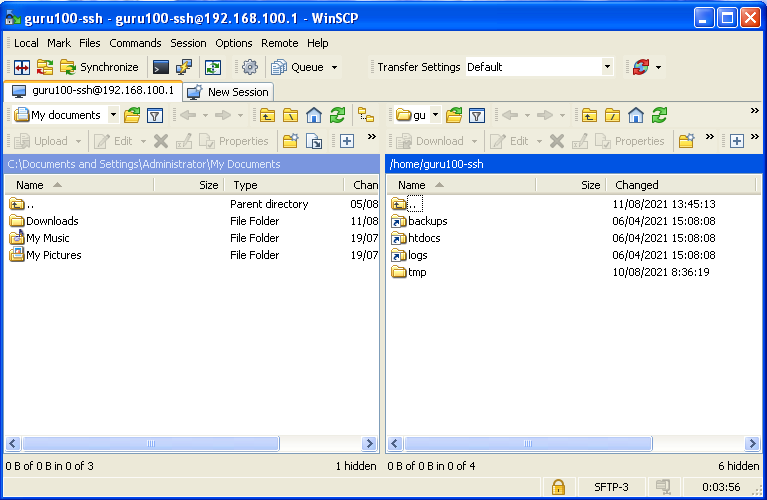
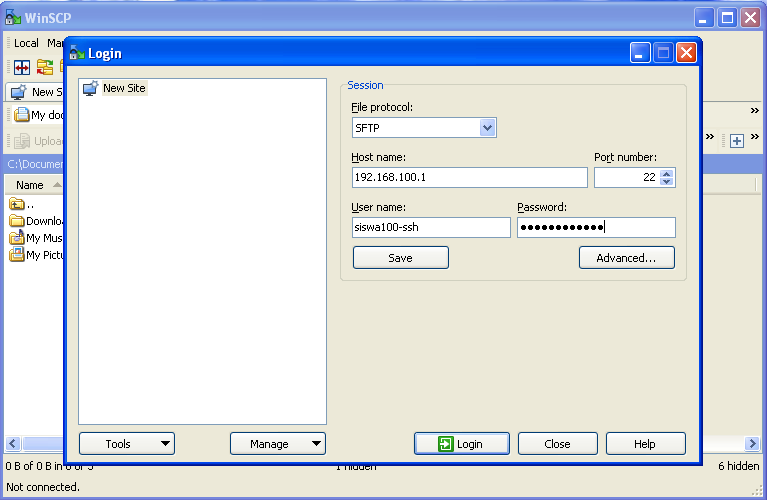
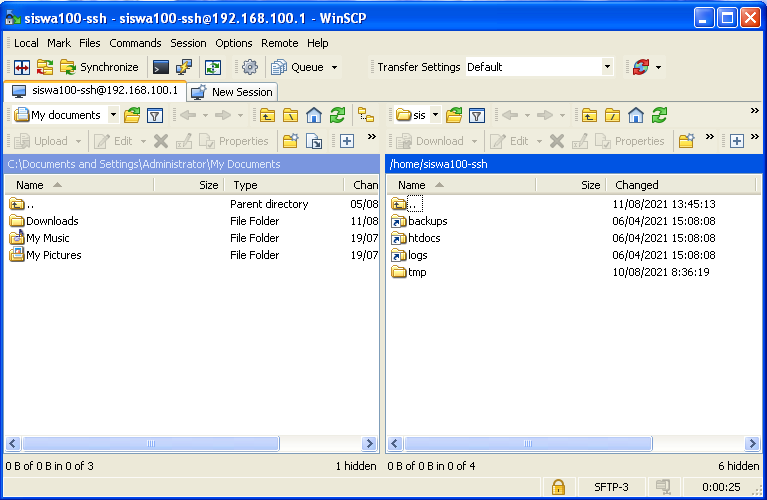
login as: siswa100-ssh siswa100-ssh@192.168.100.1's password: ######################################################## ### Welcome to CloudPanel ### ######################################################## * Website: https://www.cloudpanel.io * Documentation: https://www.cloudpanel.io/docs/cloudpanel-ce/v1/ * CloudPanel: https://sekolah100.sch.id:8443/ * CloudPanel CLI: clpctl list siswa100-ssh@cloudpanel:~$ ls backups htdocs logs tmp siswa100-ssh@cloudpanel:~$Menggunakan aplikasi WinSCP
-
Uji akses ke situs https://guru100.sch.id dan https://siswa100.sch.id
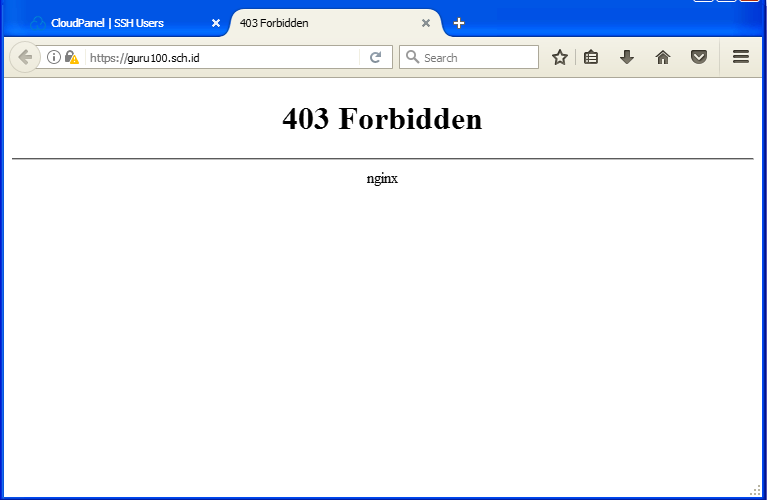
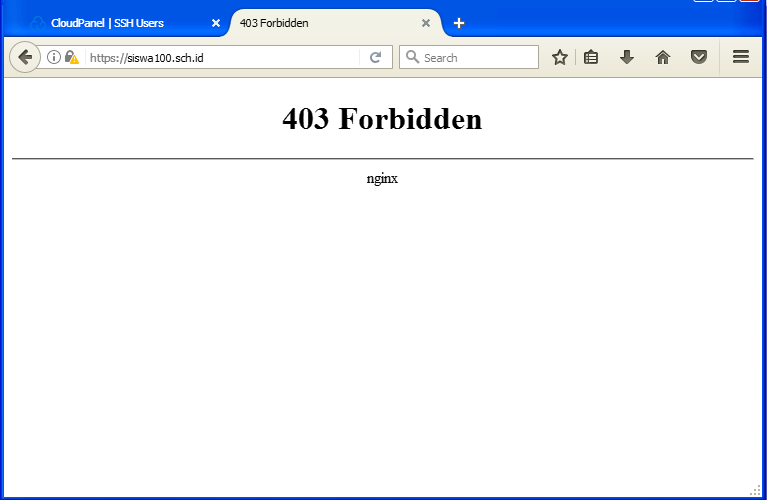
Kedua situs sudah dapat diakses dengan baik, walaupun tampilanya muncul pesan “403 Forbidden”, hal ini dikarenakan didalam direktori htdocs pada masing-masing website masih kosong.
Untuk selanjutnya kita akan membuat file index.html pada masing-masing situs agar tampilannya tidak “403 Forbidden”.
Dengan menggunakan aplikasi WinSCP login-lah sebagai user guru100-ssh.

Perhatikan jendela yg sebelah kanan, dobel klik pada folder htdocs

Dobel klik pada folder guru100.sch.id
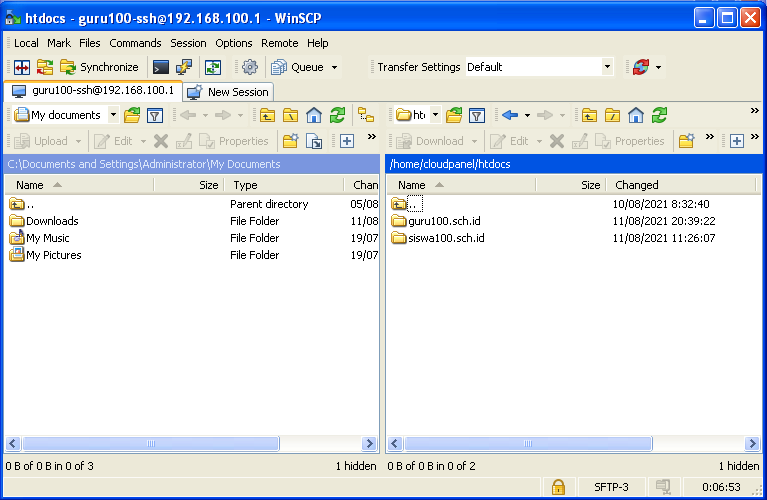
Klik kanan – New – File
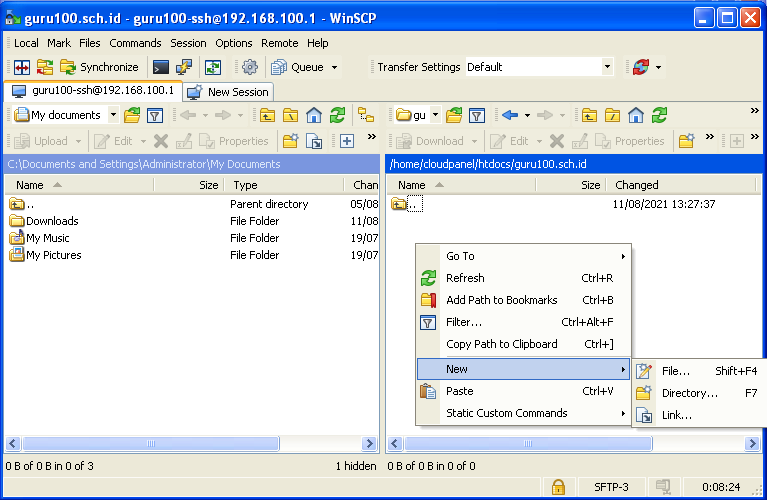
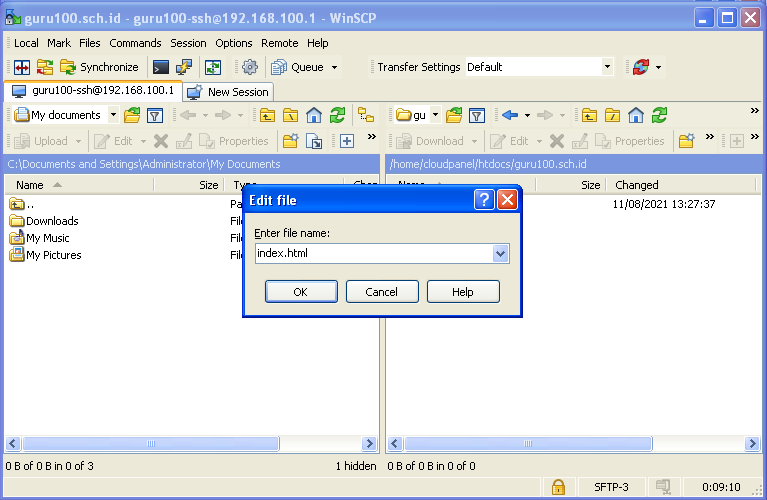
Ketik nama file index.html
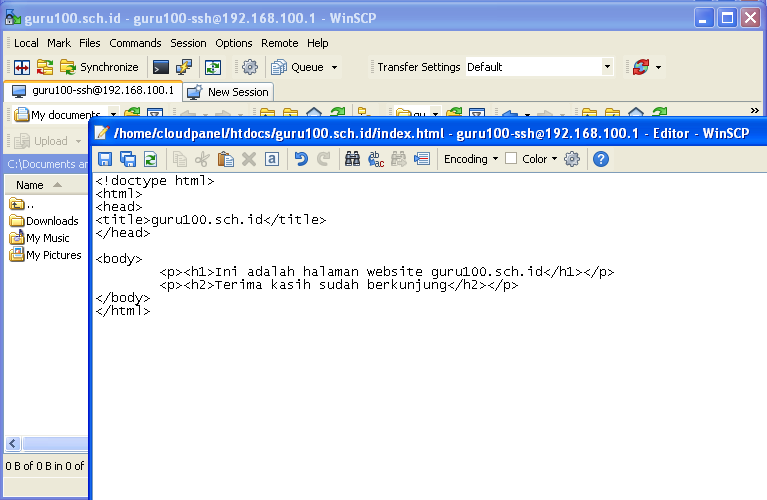
Ketik script html sederhana seperti tampak pada gambar, kemudian simpan dan tutup file index.html
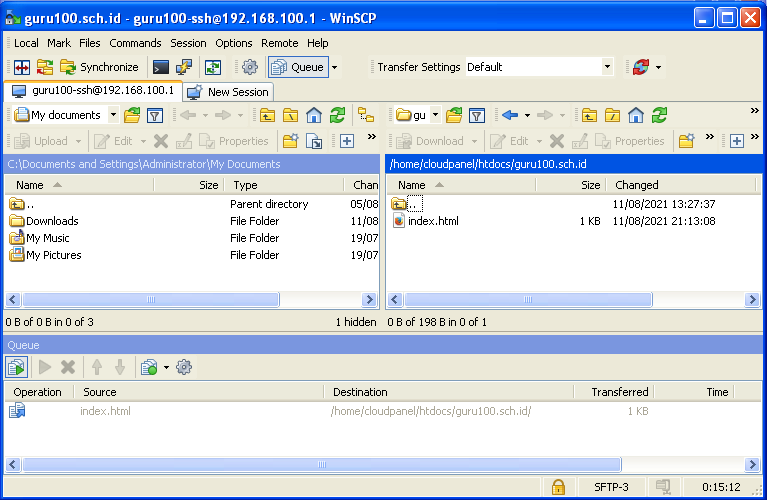
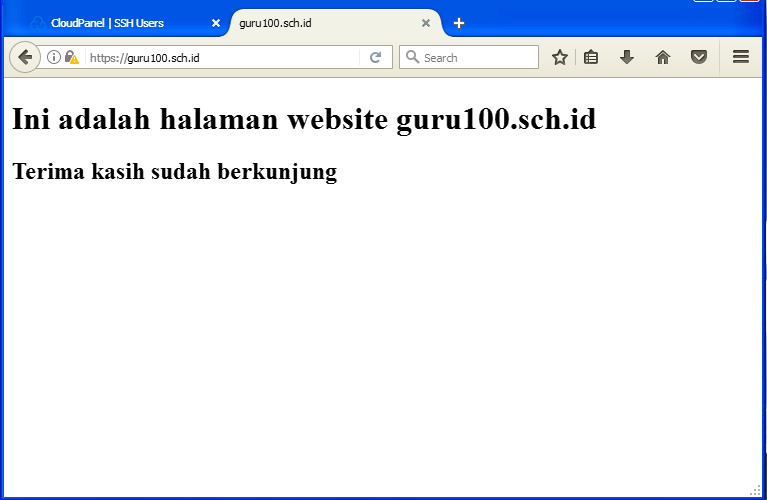
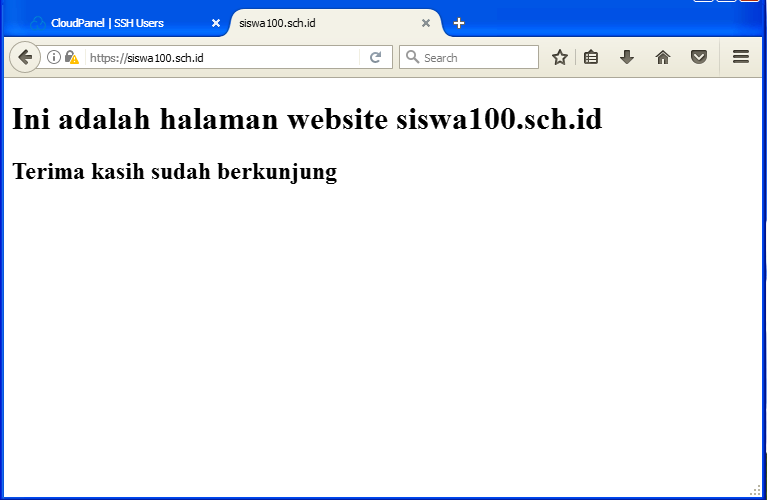
Kembali ke browser dan lihat hasilnya. Lakukan hal yang sama untuk situs siswa100.sch.id
Situs siswa100.sch.id
-
- DHCP Server
- Kesimpulan
Selamat! akhirnya kita telah belajar dan berhasil mengelola user, Domain, Web Server, PHP, dengan mudah melalui Control panel CloudPanel.


